Follow ALL SAFETY GUIDELINES AND RECOMMENDATIONS provided by the manufacturers of your tools, and any chemicals such as glue and finishes you use in this project. YOU are responsible for your safety, so use common sense when working in the shop!InstructionsYou have two choices for joinery for the levels - either deck screws or pocket hole screws. Either will work just as well. Make sure the pocket hole screws you use are rated for exterior use. Take a look at this video for a tip on marking the arcs on the rails.
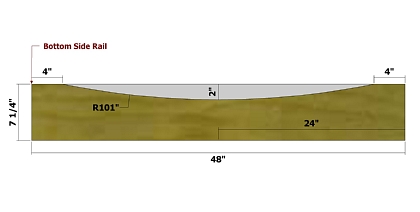
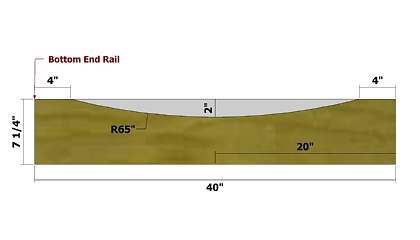
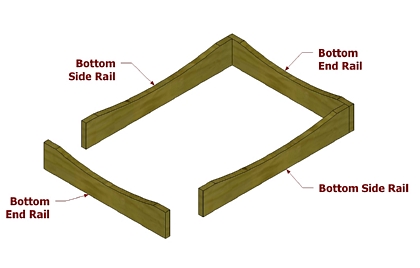
If using pocket hole joinery, set your pocket hole jig for 1 1/2" stock and drill three pocket holes on each end of the Bottom Side Rail. If using 3" deck screws, drill three pilot holes 3/4" in from the ends of the Bottom End Rail.
Position the parts as shown and attach using 2 1/2" pocket hole screws or 3" deck screws.
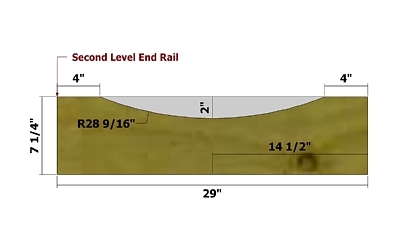
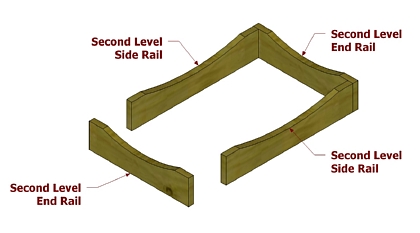
If using pocket hole joinery, set your pocket hole jig for 1 1/2" stock and drill three pocket holes on each end of the Second Level Side Rail. If using 3" deck screws, drill three pilot holes 3/4" in from the ends of the Second Level End Rail.
Position the parts as shown and attach using 2 1/2" pocket hole screws or 3" deck screws.
Position the parts as shown and attach using 2 1/2" deck screws.
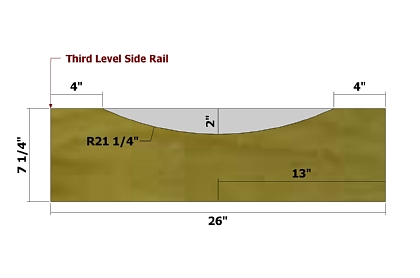
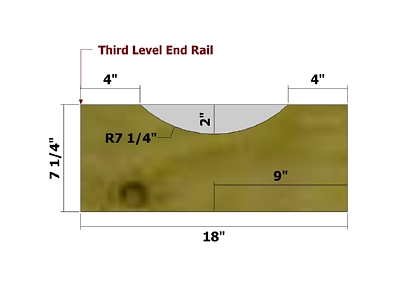
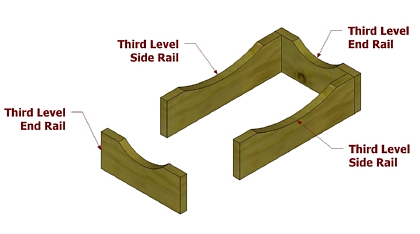
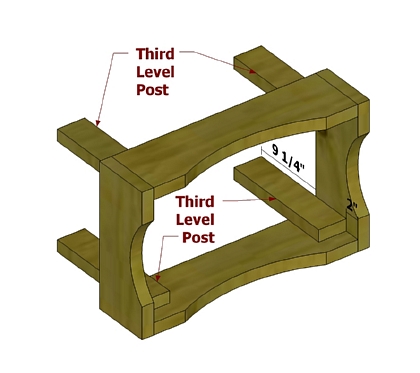
If using pocket hole joinery, set your pocket hole jig for 1 1/2" stock and drill three pocket holes on each end of the Third Level Side Rail. If using 3" deck screws, drill three pilot holes 3/4" in from the ends of the Third Level End Rail.
Position the parts as shown and attach using 2 1/2" pocket hole screws or 3" deck screws.
Position the parts as shown and attach using 2 1/2" deck screws.
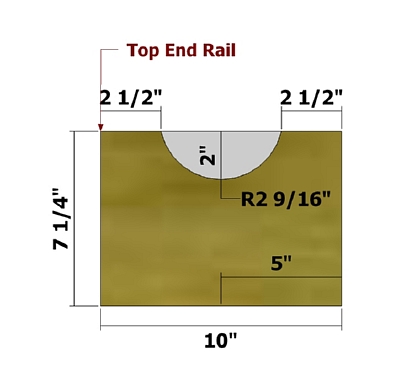
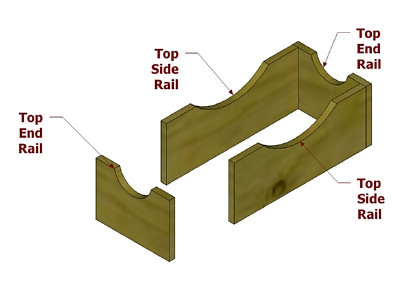
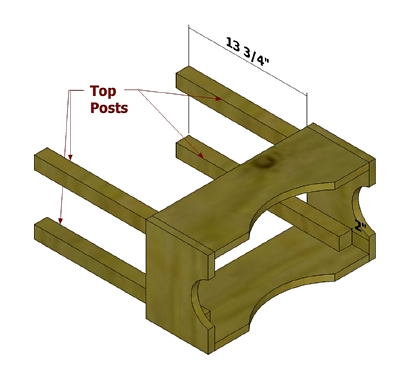
If using pocket hole joinery, set your pocket hole jig for 3/4" stock and drill three pocket holes on each end of the Top Side Rail. If using 1 1/4" deck screws, drill three pilot holes 3/8" in from the ends of the Top End Rail.
Position the parts as shown and attach using 1 1/4" pocket hole screws or 1 1/4" deck screws.
Position the parts as shown and attach using 1 1/4" deck screws.
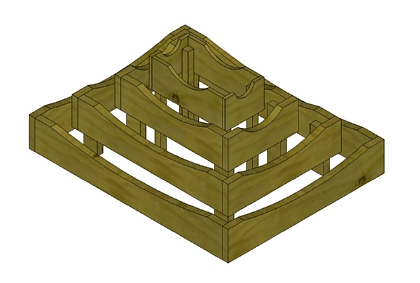
Position the levels centered. Add soil after you place each level.
What Youll Need
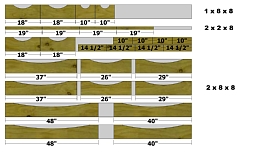
Lumber1 - 1 x 8 x 81 - 2 x 2 x 85 - 2 x 8 x 8(availability will vary) Hardware & Supplies3" deck screws or 2 1/2" pocket hole screws2 1/2" deck screws1 1/4" deck screws &/or 1 1/4" pocket hole screwswood gluepaint/stain Toolstable saw (optional)miter sawjigsawsander/belt sanderdrill/driver Kreg Pocket Hole Jig (optional)clampssquare
Parts
Bottom Side Rails (2) - 1 1/2 x 7 1/4 x 48Bottom End Rails (2) - 1 1/2 x 7 1/4 x 40Second Level Side Rails (2) - 1 1/2 x 7 1/4 x 37Second Level End Rails (2) - 1 1/2 x 7 1/4 x 29Second Level Posts (4) - 1 1/2 x 3 1/2 x 10Third Level Side Rails (2) - 1 1/2 x 7 1/4 x 26Third Level End Rails (2) - 1 1/2 x 7 1/4 x 18Third Level Posts (4) - 1 1/2 x 3 1/2 x 14 1/2Top Side Rails (2) - 3/4 x 7 1/4 x 48Top End Rails (2) - 3/4 x 7 1/4 x 40Top Posts (4) - 1 1/2 x 1 1/2 x 19 All parts are listed in actual dimensions. Refer to the Cutting Diagram below as a guide for determining the specific board from which to cut the parts. Some of the posts can be cut from 2x4 rather than 2x8, in case you do not want to rip down a 2x8 or you do not have a table saw.