|
|
 |
|
|
|
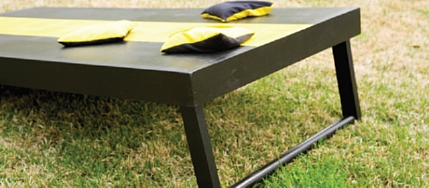
Cornhole/Bean Bag Toss |
|
|
 |
|
|
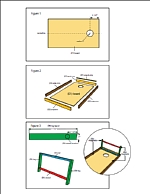
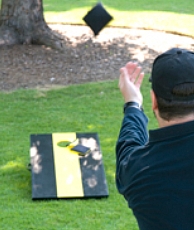
Cut and label the parts as needed, using the Cut List and Cutting Diagram as guides and adjusting for fit. Cut the boards holea. Measure and mark the location for the hole on the (01) board as shownin Figure 1. Use a compass and a pencil to draw the outline for the hole.b. Use a jigsaw to cut out the hole. Attach the trim partsa. Using glue and nails, attach the (02) side trim to the (01) board with the ends and top edges flush (see Figure 2). Note: This creates an approximately 2-inch reveal on the back of the (01) board.b. Attach the (03) end trim to the (01) board and to the (02) side trim using glue and nails. The (03) end trim covers the ends of the (02) side trim. Make the boards standa. Following the (04) leg layout in Figure 3, cut the (04) legs to shape and scribe the (06) dowel location.b. Position the (05) rail flush with the 90-degree ends of the (04) legs, and attach using glue and screws.c. Using glue and screws, attach the (06) dowel as shown in Figure 3.d. On the back of the board assembly, position the (07) stand strip flush with the inside edges, and attach with glue. Paint the assemblies, and attach the hardwarea. Fill holes with wood filler; sand, prime, and paint the board and stand assemblies.b. Place the board assembly facedown. Lay the stand assembly in the folded-down position with the (04) legs long point facing up. The (05) rail should be flush against the 1/4-inch side of the (07) stand strip.c. Attach the stand assembly to the (07) stand strip with 2-inch utility hinges.d. Position a disc magnet 3/4 inch from the bottom on the back of each (04) leg, and then attach with construction adhesive.e. Lay the stand assembly in the folded-down position, and mark the placement of the magnets on the (01) board.f. Using construction adhesive, attach the corresponding disc magnet for each leg to the (01) board. Note: Test the placements of the magnets to make sure they will attract each other.g. Allow the construction adhesive to dry overnight.h. Attach a door pull in the center of one (02) side trim part. How to playIf you can throw straight, you can master the art of playing cornhole.Game PlayPlayers stand 27 feet from the closest edge of the cornhole board. Each player takes turns throwing four bags. The board is then cleared, and the next player takes a turn.ScoringTo score, a bag must land on the board or in the hole. A bag landing on the board, hanging off the board, or hanging on the hole is worth 1 point. A bag that falls through the hole is worth 3 points. A player may toss a bag directly into the hole, slide a bag in, or use another bag to push in a bag thats already on the board. The first player to score 21 is the winner.For a detailed explanation of the official rules and setup, visit the American Cornhole Association at PlayCornhole.org. How To Make Cornhole BagsFor each bag, cut two 7-inch-square pieces of fabric. Place the pieces together. Using a sewing machine, sew a 1/2-inch seam around the sides of the bag, leaving an opening in the middle of one side. Turn the square inside out, and fill with 11/2 to 2 cups of corn. After youve filled the bag, fold the open seam in and stitch with your machine. Make sure the bag is sealed; doublestitching is required. |
|
|
|
|
|
A plan I originally created for Lowes Creative Ideas for Woodworkers magazine.
Download the Cutting Diagram and Illustrations by clicking on the links at the bottom of this column..
|
|
|
|
|
 |
|
|
|
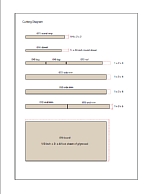
Cut List# Part Name - Quantity - Material - Size (in inches)01 board - 1 - plywood - 1⁄2 x 22 1⁄2 x 46 1⁄202 side trim - 2 - 1 x 3 x 4 - 3⁄4 x 2 1⁄2 x 46 1⁄203 end trim - 2 - 1 x 3 x 6 - 3⁄4 x 2 1⁄2 x 2404 legs - 2 - 1 x 2 - 3⁄4 x 11⁄2 x 11 1⁄2*05 rail - 1 - 1 x 2 - 3⁄4 x 1 1⁄2 x 20 3⁄406 dowel - 1 - round dowel - 1 x 20 3⁄407 stand strip - 1 - 1/4 x 2 - 1⁄4 x 1 1⁄2 x 22 1⁄2* From long point to end. |
|
|
|
Tools you'll use:circular saw with straight edge guidemiter saw (or handsaw with miter box)jigsawdrill/driver with bitspower sander and various grits ofsandpapertape measurecompasspaintbrushpencil Lumber1 board, 1⁄4 x 2 x 21 board, 1 x 2 x 42 boards, 1 x 3 x 41 board, 1 x 3 x 61 round dowel, 1- x 48-inch1 sheet of plywood, 1⁄2-inch x 2- x 4-foot Hardware & Supplies1 (53⁄4-inch-long) door pull2 (2-inch) utility hinges1 package (#8 x 2-inch) screws1 box of 4d finishing nails1 package (3⁄4-inch) disc magnetspaintable wood filler (PL)wood glue (Titebond II)construction adhesive1 quart of exterior primer (Valspar)1 quart of exterior paint (Valspar UltraPremium, Dark Kettle Black 4011-2, semigloss)1 quart of paint (Valspar Ultra Premium,Tangy 3008-1A, semi-gloss)*Availability varies by market. |
|
|
 |
|
| (C) Chris Hill/Chiefs Shop 2009-2014 |
|
|
|
|